Eclipse How To Create A New Workspace
If you do a lot of development work for lots of different programs or projects, you could try grouping them into separate workspaces in Eclipse.
It's really easy to do and is a nice way to keep different types of projects together.
As you probably know, the default workspace is called 'workspace' and lives under your home folder on Linux. If you want to use additional workspaces, the steps below cover everything you need to know about using multiple workspaces:
1. Create a new folder
In your home directory, you need to create a new folder, which will be the location of your new workspace. You can call this folder anything: Coursework or 3DProjects, for example.
2. Switch to the new workspace in Eclipse
Open Eclipse and select File > Switch Workspace -> Other.
Browse to the location of the folder you created in step 1.
Then click OK.
Eclipse will close and re-open in the new workspace.
You can create new projects in here, have new settings, and it will all be completely separate from your old workspace.
3. Eclipse remembers all the workspaces you have opened
To switch back to the original one, select File -> Switch Workspace and you should see it listed in the box that pops out:

4. You can edit the workspace list, and how many workspaces Eclipse remembers
If you delete a workspace completely, Eclipse may still store the data in its own cache.
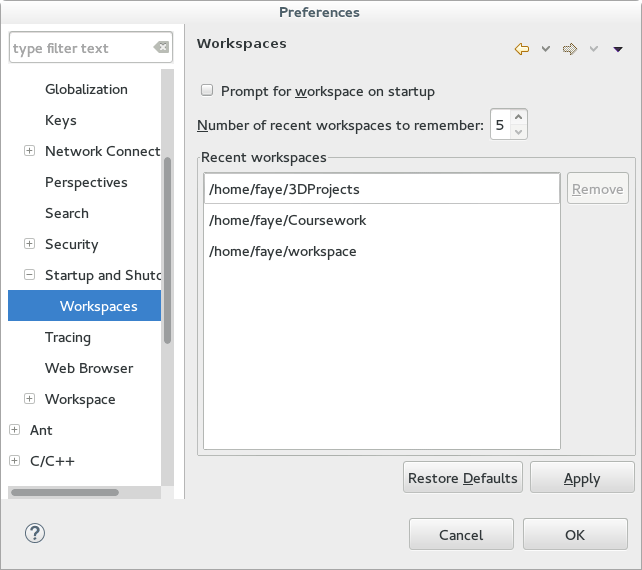
To tidy-up the workspace list, you can edit the available workspaces under Window -> Preferences -> General -> Startup and Shutdown -> Workspaces.
Remove any that you no longer need, and set the number of workspaces you'd like Eclipse to store:

5. If you have missing projects in an Eclipse workspace, use the import existing projects option
If you've copied a workspace from another computer that already has Eclipse projects inside it, the first time you open the workspace you may have to import those projects so that you can see them.
Go to File -> Import -> General -> Exiting Projects into Workspace
Select the root directory, which by default is the current workspace folder – so just click okay.
You should see the projects from your workspace listed in the Projects window, with a tick in each box.
Ignore the message at the top that says Some projects cannot be imported because they already exist in the workspace.
Then click Finish.
Your projects should all appear in the Project Explorer window.
6. Set Eclipse to prompt for workspace on startup
When you switch to a workspace, Eclipse will take that as the default workspace going forward. So if you close everything down and come back tomorrow, Eclipse will open the last workspace you were using.
If you want to choose the workspace every time you start Eclipse, go to Window -> Preferences -> General -> Startup and Shutdown -> Workspaces and check the box at the top for 'Prompt for workspace on startup'.
Eclipse How To Create A New Workspace
Source: https://www.fayewilliams.com/2015/03/10/using-multiple-workspaces-in-eclipse/
Posted by: ramergoope1995.blogspot.com

0 Response to "Eclipse How To Create A New Workspace"
Post a Comment